
Optimizing Sample Preparation for DNA Extraction: A Guide for Reliable Results
Research and investigation are at the foundation of molecular biology, underpinning everything from disease to diagnostics, PCR to next-generation sequencing. However, the quality of DNA research is only as good as the techniques employed. Whether you’re using PCR or next-gen sequencing, optimizing your sample prep can significantly improve downstream results.
In this post, we’ll walk through best practices and considerations for preparing biological samples to ensure high-quality DNA extraction.
1. Understand Your Sample Type
Different biological materials require tailored approaches:
- Cell Cultures: Relatively low complexity and high cell density
- Whole Blood: Rich in nucleated cells but contains inhibitors like hemoglobin and anticoagulants that can interfere with extraction.
- Saliva: Large nucleated cells, microbes and highly enriched for mucins that can create insoluble materials in your lysate
2. Sample Collection and Storage
Cell Cultures
- Harvest at the right confluency: 80–90% confluency ensures optimal DNA yield.
- Avoid over-trypsinization: This can damage cells, and reduce cell viability which leads to lower DNA yield.
Whole Blood
- Use EDTA tubes: EDTA preserves DNA integrity better than heparin or citrate.
- Store at 4°C short-term: For long-term storage, freeze at -80°C.
- Avoid repeated freeze-thaw cycles: These degrade DNA.
Saliva
- Use sterile, DNA-free containers or commercial saliva collection kits (DPX methods are Oragene compatible)
- Store properly for short-term or long-term to preserve DNA integrity
3. Cell Lysis Optmization
Efficient lysis is crucial for releasing DNA. Traditional protocols include:
- Mechanical disruption (e.g., bead beating) may be needed for tough samples.
- Chemical lysis using detergents (SDS, Triton X-100) helps break membranes.
- Enzymatic digestion (e.g., Proteinase K, RNase A) removes proteins and RNA contaminants.
Tip: Incubation for 1–3 hours can support thorough digestion.
4. Removal of Contaminants for DNA Purification
This is a crucial step to remove contaminants like proteins, lipids, and heme that can inhibit downstream applications. Traditional spin columns are manual, labor intensive, and time-consuming. These traditional methods can require ancillary equipment like centrifuges, vortex mixers, vacuum manifolds or magnet setups. Steps like centrifugation or vortex mixing can lead to sample loss.
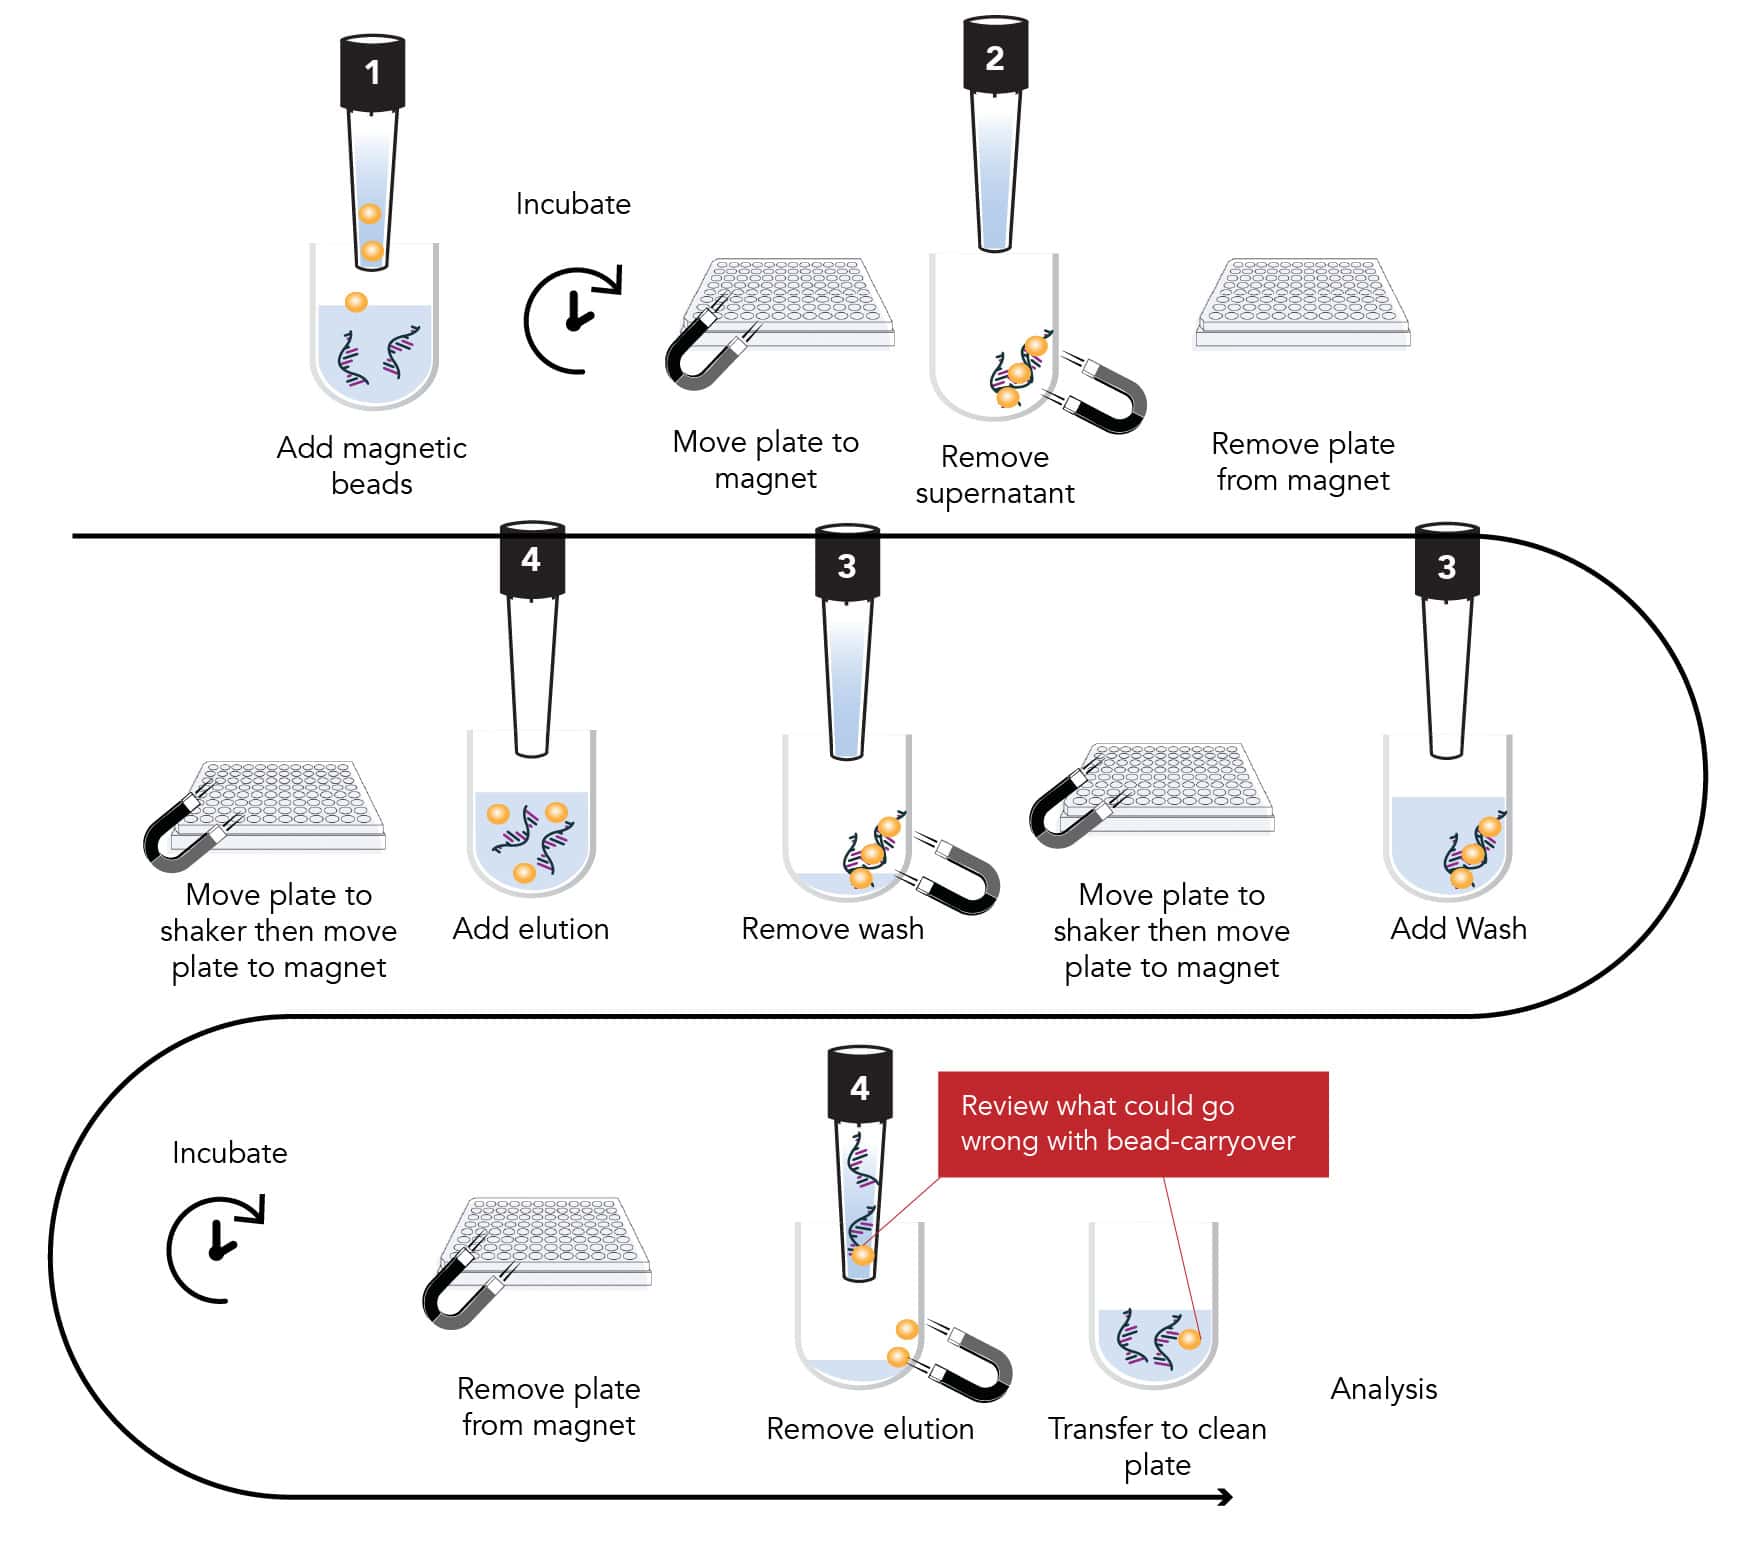
While magnetic bead methods offer scalability and automation, they can still be time-intensive, costly, and often requiring complex programming to prevent common problems like bead carryover -where the beads remain in the final DNA eluate.
What could go wrong with bead carryover?
- Interference with downstream applications – magnetic beads can inhibit polymerase activity leading to poor amplification or complete failure. Beads can interfere with library preparation and sequencing causing reduced read quality or yield.
- Sample Contamination– residual beads can carryover contaminants (proteins salts ethanol) when not fully washed away. In automated workflows bead carryover can increase risk of sample-to-sample contamination.
- Instrument Damage or Clogging- Beads can clog channels or damage pumps in system like qPCR instruments or sequencers. Beads can interfere with liquid handling robots causes inaccurate volumes or tips clogging.
- Data Quality and Reproducibility – bead carryover can vary between samples, introducing variability and reducing reproducibility
Mitigation strategies for reducing common problems include additional centrifugation steps to remove beads, lots of optimization on the automated liquid handler or consider bead-free alternatives especially for sensitive downstream applications.
DPX products for Nucleic Acid Extraction can alleviate the most common challenges and provide high yields with robust high-quality results.
| NiXTips | Spin Column | Magnetic Beads | |
|---|---|---|---|
| High Efficiency | ✅ | ✖️ | ✖️ |
| Cost Effective | ✅ | ✅ | ✖️ |
| Scalable | ✅ | ✖️ | ✅ |
| Automation Compatible | ✅ | ✖️ | ✅ |
| No additional hardware required | ✅ | ✖️ | ✖️ |
| No bead preparation. No mixing | ✅ | ✖️ | ✖️ |
Example DPX Method for DNA Extraction using NiXTips compared to a generic magnetic bead-based protocol
Click the image to expand.
DPX methods for DNA extraction require less transfer tips, which saves money and reduces plastic consumption. Click the image to expand.
Troubleshooting Tips
| Problem | Possible Cause | Solution |
|---|---|---|
| Low Yield | Incomplete Lysis Incomplete Binding Inefficient elution | Increase incubation time or enzyme concentration Increase number of binding cycles Elute sample at 40 deg. C |
| Degraded DNA | Harsh handling or old samples | Use fresh sample, minimize vortexing |
| Contamination | Inadequate washing | Add extra wash step or use higher-grade reagents |
Conclusion
Optimizing sample preparation is a critical step that can make or break your DNA extraction workflow. By tailoring your approach to the sample type and following best practices, you can ensure high-quality DNA suitable for any downstream application.
Methods with NiXTips do not require expensive magnetic beads, bead preparation steps, no risk of bead carryover or dead volume retained in bead pellet. Contact us to try NiXTips in you lab.